Hi! My last post gives an overview about how to prepare for JNCIA certification and get started with Junos OS. This post is for the people who are looking to get some hands on with Junos OS devices.
If you do not have access to real physical Juniper devices, you can try Juniper Networks’s vSRX (formely known as Firefly Perimeter) virtual firewall.
Download and deploy the virtual appliance in VMware ESXi
You can download (evaluation download) vSRX VMware/KVM virtual appliance here. Please refer vSRX documentation to know about vSRX, its features, download/install instructions and initial configuration etc.
In this post, I intend to introduce vSRX to those who have not heard about it ( I think I am already done 🙂 ) and like to discuss how to setup simple OSPF topology with the vSRX deployed inside the VMware ESXi host.
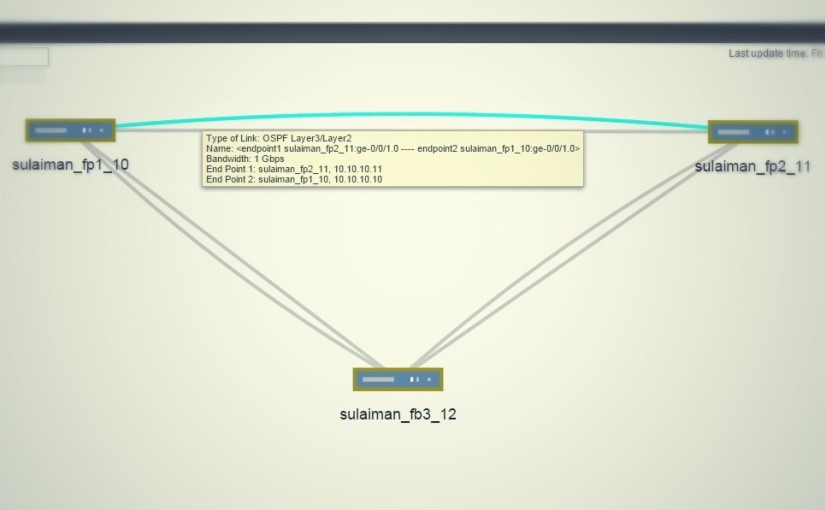
Topology
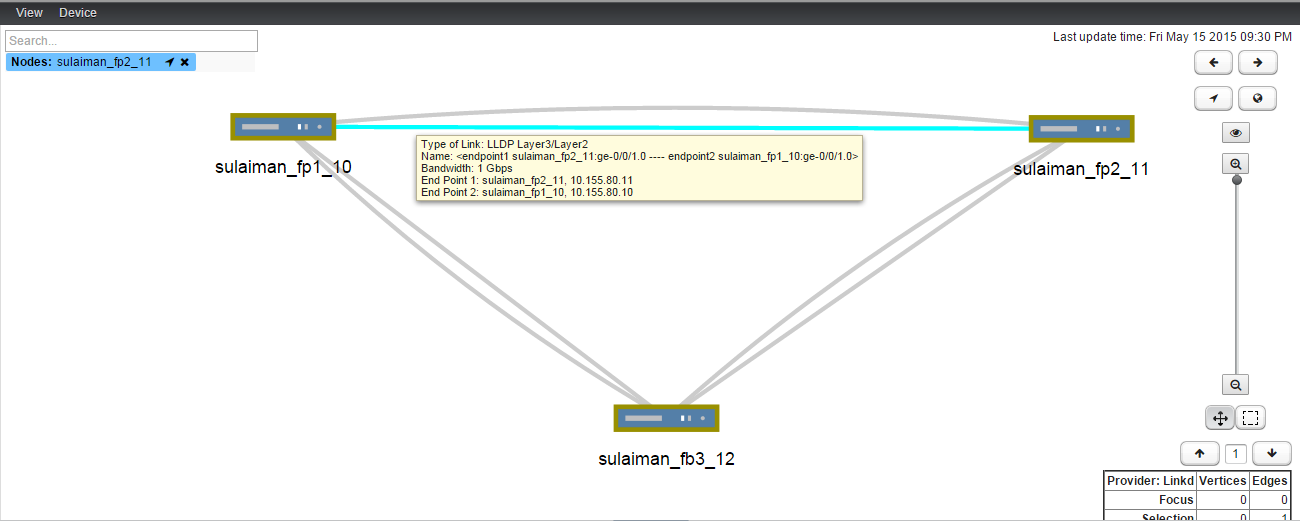
Three vSRX VMs and OSPF is running in the vSRX.

The above screenshot is taken from Junos Space Network Management Platform’s Network Monitoring topology (Powered by OpenNMS).
Setup
Three vSRX virtual appliances have been deployed in ESXi hosts.
- sulaiman_fp1_10
- sulaiman_fp2_11
- sulaiman_fp3_12
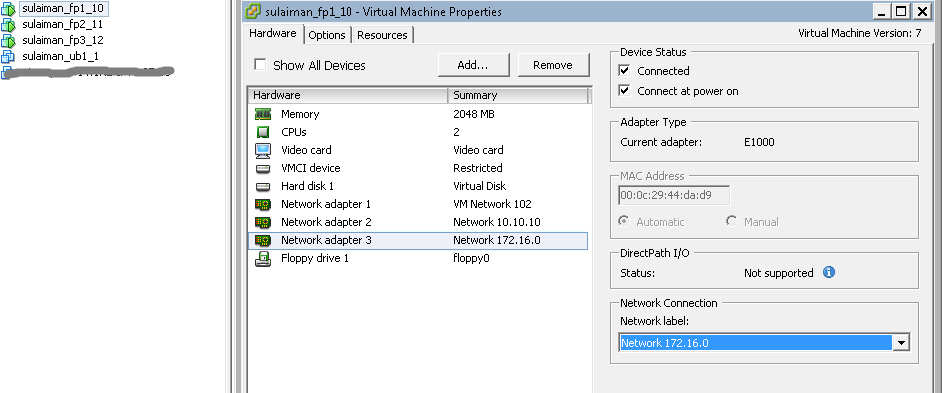
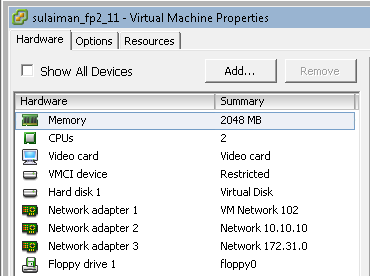
I have added one extra vNIC on all the vSRXs. By default it comes with 2 vNICs. You can add up to 10 vNICs.
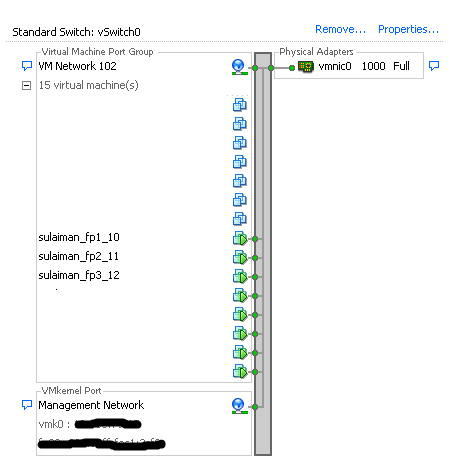
I used ge-0/0/0.0 interface as management interface on all the vSRX and hence the Network Adapter 1 (ge-0/0/0.0 interface) is assigned to the port-group configured in the vSphere Standard Switch which has uplink to physical switch.
All the initial configuration on the vSRX is done (i.e root password, default static route etc.) Please refer above documentation link if you have difficulty in setting up the initial configuration.
VMware Standard Switch
vSphere has many types of virtual switches (i.e Standard Switch, Distributed Switch and NSX Logical switch)
To form a OSPF topology with three network segments as show in above topology, I have used Standard Switch by creating three vSwitches and configured one port-group each in it.
You can also create a single vSwitch and configure three port-groups with different VLAN ID.
The remaining network adapters of vSRX are assigned to appropriate port-group based on the network segments (See below).
There are no uplinks required for these port-groups as traffic between these network segments will never leave the host (hypervisor). vSRX will route traffic between them!
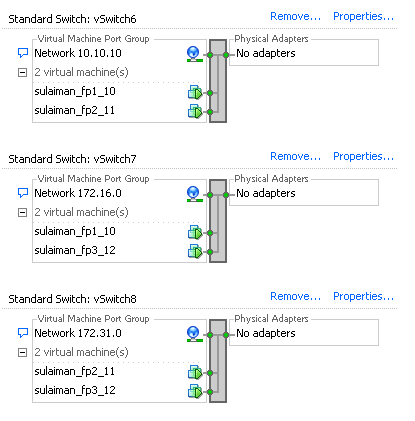

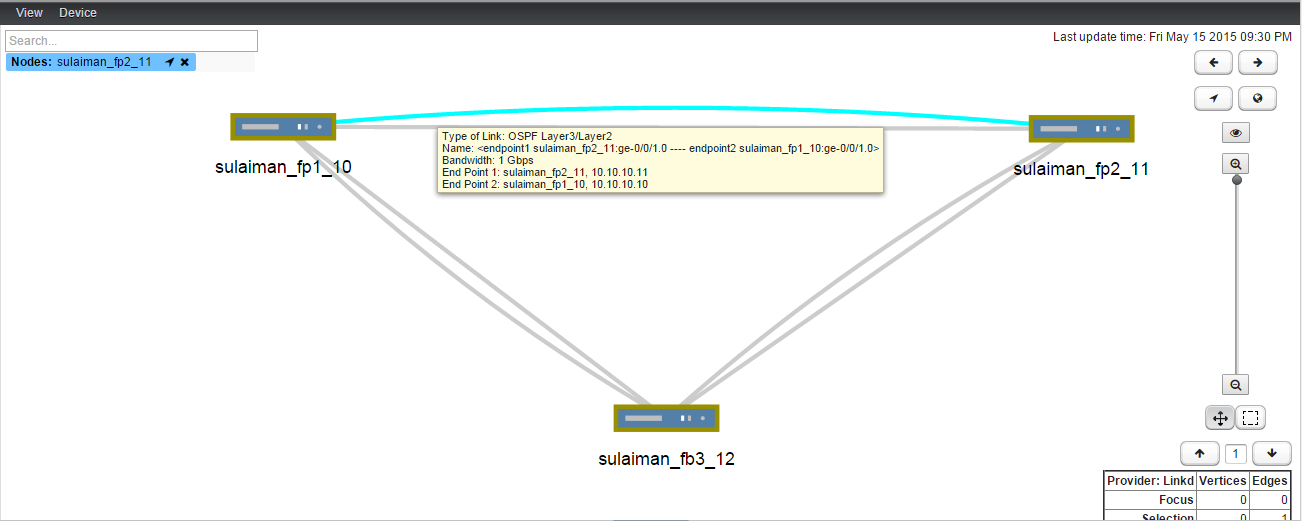
- 10.10.10.0/24 Between sulaiman_fp1_10 (ge-0/0/1.0) and sulaiman_fp2_11 (ge-0/0/1.0)
- 172.16.0.0/24 Between sulaiman_fp1_10 (ge-0/0/2.0) and sulaiman_fp3_12 (ge-0/0/1.0)
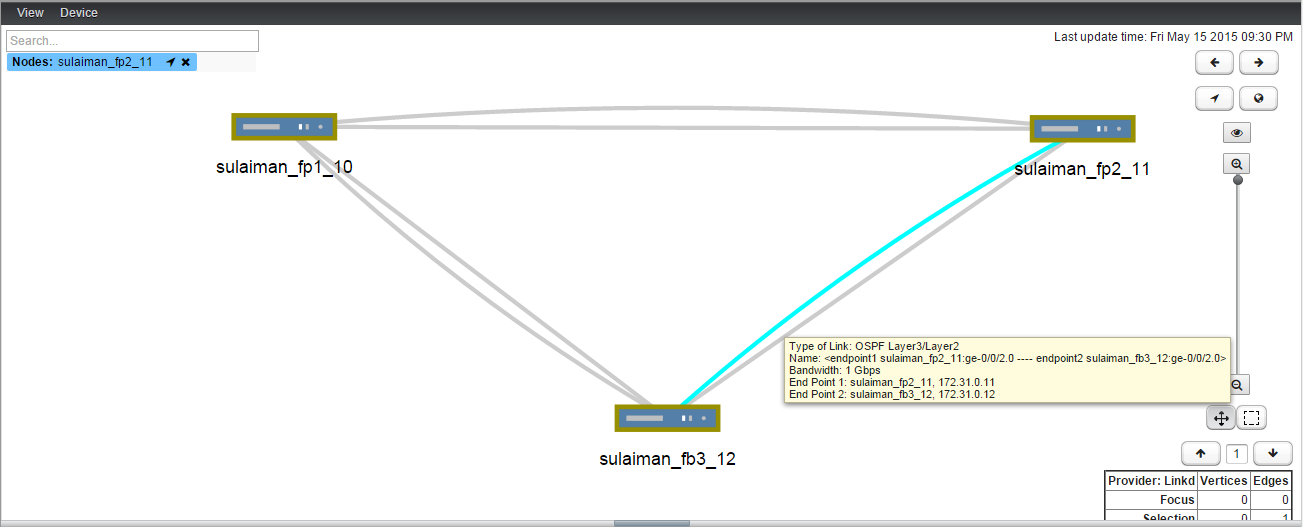
- 172.31.0.0/24 Between sulaiman_fp2_11 (ge-0/0/2.0) and sulaiman_fp3_12 (ge-0/0/2.0)
Interface configuration snippet
sulaiman_fp1_10
root@sulaiman_fp1_10> show version
Hostname: sulaiman_fp1_10
Model: firefly-perimeter
JUNOS Software Release [12.1X47-D20.7]
root@sulaiman_fp1_10> show configuration | display set | match "unit 0"
set interfaces ge-0/0/0 unit 0 family inet address 10.155.80.10/20
set interfaces ge-0/0/1 unit 0 family inet address 10.10.10.10/24
set interfaces ge-0/0/2 unit 0 family inet address 172.16.0.10/24
set interfaces lo0 unit 0 family inet address 1.1.1.1/32
sulaiman_fp2_11
root@sulaiman_fp2_11> show configuration | display set | match "unit 0"
set interfaces ge-0/0/0 unit 0 family inet address 10.155.80.11/20
set interfaces ge-0/0/1 unit 0 family inet address 10.10.10.11/24
set interfaces ge-0/0/2 unit 0 family inet address 172.31.0.11/24
set interfaces lo0 unit 0 family inet address 2.2.2.2/32
sulaiman_fp3_12
root@sulaiman_fb3_12> show configuration | display set | match "unit 0"
set interfaces ge-0/0/0 unit 0 family inet address 10.155.80.12/20
set interfaces ge-0/0/1 unit 0 family inet address 172.16.0.12/24
set interfaces ge-0/0/2 unit 0 family inet address 172.31.0.12/24
set interfaces lo0 unit 0 family inet address 3.3.3.3/32
IMPORTANT: vSRX is firewall, so configure security-zones and allow needed traffic between the zones. If you do not require vSRX to run in flow mode, you can disable the flow mode.
Sample configuration snippet to configure security-zones
set security policies from-zone trust to-zone trust policy default-permit match source-address any
set security policies from-zone trust to-zone trust policy default-permit match destination-address any
set security policies from-zone trust to-zone trust policy default-permit match application any
set security policies from-zone trust to-zone trust policy default-permit then permit
set security policies from-zone trust to-zone untrust policy default-permit match source-address any
set security policies from-zone trust to-zone untrust policy default-permit match destination-address any
set security policies from-zone trust to-zone untrust policy default-permit match application any
set security policies from-zone trust to-zone untrust policy default-permit then permit
set security policies from-zone untrust to-zone trust policy default-deny match source-address any
set security policies from-zone untrust to-zone trust policy default-deny match destination-address any
set security policies from-zone untrust to-zone trust policy default-deny match application any
set security policies from-zone untrust to-zone trust policy default-deny then deny
set security zones security-zone trust tcp-rst
set security zones security-zone trust host-inbound-traffic protocols ospf
set security zones security-zone trust interfaces ge-0/0/1.0 host-inbound-traffic system-services any-service
set security zones security-zone trust interfaces ge-0/0/2.0 host-inbound-traffic system-services any-service
set security zones security-zone trust interfaces lo0.0 host-inbound-traffic system-services any-service
set security zones security-zone untrust screen untrust-screen
set security zones security-zone untrust interfaces ge-0/0/0.0 host-inbound-traffic system-services http
set security zones security-zone untrust interfaces ge-0/0/0.0 host-inbound-traffic system-services https
set security zones security-zone untrust interfaces ge-0/0/0.0 host-inbound-traffic system-services ssh
set security zones security-zone untrust interfaces ge-0/0/0.0 host-inbound-traffic system-services telnet
set security zones security-zone untrust interfaces ge-0/0/0.0 host-inbound-traffic system-services dhcp
set security zones security-zone untrust interfaces ge-0/0/0.0 host-inbound-traffic system-services ping
set security zones security-zone untrust interfaces ge-0/0/0.0 host-inbound-traffic system-services snmp
Above snippet should be self explanatory. Most of the configuration will comes as default factory settings. You can see management interface ge-0/0/0.0 is bound to untrust zone and only the management related traffic is enabled. Pay attention to this config if you find something is not working in your environment.
Configure single area OSPF
It is very straightforward!
root@sulaiman_fp1_10> show configuration | display set | match ospf
set protocols ospf area 0.0.0.0 interface ge-0/0/0.0 passive
set protocols ospf area 0.0.0.0 interface ge-0/0/1.0
set protocols ospf area 0.0.0.0 interface ge-0/0/2.0
set protocols ospf area 0.0.0.0 interface lo0.0 passive
set security zones security-zone trust host-inbound-traffic protocols ospf
Note: ge-0/0/0.0 and loopback interface is configured as passive OSPF interface. Loopback address will be the router-id.
root@sulaiman_fp1_10> show ospf neighbor
Address          Interface              State     ID               Pri  Dead
10.10.10.11      ge-0/0/1.0             Full      2.2.2.2          128    38
172.16.0.12      ge-0/0/2.0             Full      3.3.3.3          128    33
root@sulaiman_fp2_11> show ospf neighbor
Address          Interface              State     ID               Pri  Dead
10.10.10.10      ge-0/0/1.0             Full      1.1.1.1          128    36
172.31.0.12      ge-0/0/2.0             Full      3.3.3.3          128    33
root@sulaiman_fb3_12> show ospf neighbor
Address          Interface              State     ID               Pri  Dead
172.16.0.10      ge-0/0/1.0             Full      1.1.1.1          128    39
172.31.0.11      ge-0/0/2.0             Full      2.2.2.2          128    34
root@sulaiman_fb3_12> show route protocol ospf

inet.0: 12 destinations, 12 routes (12 active, 0 holddown, 0 hidden)
+ = Active Route, - = Last Active, * = Both

1.1.1.1/32         *[OSPF/10] 3w0d 18:00:17, metric 1
                    > to 172.16.0.10 via ge-0/0/1.0
2.2.2.2/32         *[OSPF/10] 3w0d 18:00:07, metric 1
                    > to 172.31.0.11 via ge-0/0/2.0
10.10.10.0/24      *[OSPF/10] 3w0d 18:00:07, metric 2
                    > to 172.16.0.10 via ge-0/0/1.0
                      to 172.31.0.11 via ge-0/0/2.0
224.0.0.5/32       *[OSPF/10] 3w0d 18:01:32, metric 1
                      MultiRecv

root@sulaiman_fb3_12> ping 10.10.10.11
PING 10.10.10.11 (10.10.10.11): 56 data bytes
64 bytes from 10.10.10.11: icmp_seq=0 ttl=63 time=10.338 ms
64 bytes from 10.10.10.11: icmp_seq=1 ttl=63 time=10.426 ms
^C
--- 10.10.10.11 ping statistics ---
2 packets transmitted, 2 packets received, 0% packet loss
round-trip min/avg/max/stddev = 10.338/10.382/10.426/0.044 ms
Configure LLDP
In the topology diagram shown above, in addition to OSPF link, LLDP links also got discovered. To configure LLDP
root@sulaiman_fp1_10> show configuration | display set | match lldp
set protocols lldp interface ge-0/0/1.0
set protocols lldp interface ge-0/0/2.0
root@sulaiman_fp1_10> show lldp neighbors
Local Interface    Parent Interface    Chassis Id          Port info          System Name
ge-0/0/1.0         -                   4c:96:14:3e:12:80   ge-0/0/1.0         sulaiman_fp2_11
ge-0/0/2.0         -                   4c:96:14:78:91:80   ge-0/0/1.0         sulaiman_fb3_12
Hope you find this post useful! Enjoy Network Virtualization!
Bonus Tips: If you have prior experience in ScreenOS, you can take a web based training “Junos as a Security Language”
If you find any errors in the post, please contact me. I will be happy to correct it.